April 22, 2026

craftsmanship

branding iron kennewick photos sets the stage for this enthralling narrative, offering readers a glimpse into a story that is rich in detail and brimming with originality from the outset.

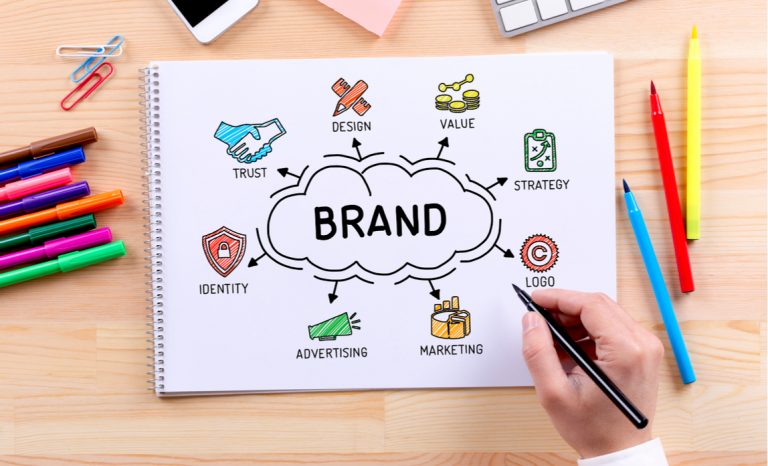
Branding irons serve as crucial tools in various industries, leaving their mark as symbols of identity and craftsmanship. In Kennewick, these tools are not just functional; they embody a rich local culture that appreciates the artistry behind branding. This overview delves into the significance of branding in the area, the photography tips for capturing their essence, and how the community showcases these unique pieces.

Overview of Branding Irons

Branding irons are tools used for marking or branding objects, commonly used across various industries. They serve as a means of identification, providing a unique mark that signifies ownership or authenticity. Branding irons can be found in sectors such as agriculture, leatherworking, and even in the culinary arts, where they are used to imprint logos or designs onto food items.Branding irons come in different types, each designed for specific applications.

The most common types include manual branding irons, which are heated traditionally, electrical branding irons that offer a more consistent heat, and even custom-made branding irons tailored to specific designs or logos. The choice of branding iron often depends on the material being branded, the size of the job, and the desired outcome.

Types of Branding Irons

Understanding the types of branding irons available can help in selecting the right one for any project. Here’s a breakdown of the most commonly used branding irons:

  • Manual Branding Irons: These are heated using methods such as a fire or propane torch. They require careful handling and offer a traditional branding approach.
  • Electric Branding Irons: These irons are plugged in to heat up and provide consistent temperatures, allowing for clearer and more precise branding.
  • Custom Branding Irons: Many brands offer options to create custom logos or designs, which can be especially useful for businesses wanting to establish a unique identity.
  • Cold Branding Irons: Used primarily in veterinary practices, these irons use extreme cold to damage the pigmentation in the skin, creating a mark without burning the tissue.

Materials Used in Branding Irons

The materials used in the production of branding irons significantly influence the quality and effectiveness of the branding. Common materials include:

  • Steel: Most branding irons are made from steel due to its durability and ability to retain heat well, ensuring a clear brand mark.
  • Brass: Some branding irons are crafted from brass, which is good for applications requiring less aggressive branding, such as on softer materials.
  • Aluminum: Lightweight and resistant to rust, aluminum branding irons are often used for prototyping or temporary branding solutions.

The choice of material impacts not just the quality of the brand but also the longevity of the branding iron itself. For instance, a steel iron may withstand high temperatures better than one made of brass, ensuring that the branding remains crisp and clear over time.

“The effectiveness of branding relies heavily on the choice of material and the method of application.”

Branding irons, regardless of their type or material, are essential tools across various industries, providing a reliable method for marking ownership and authenticity.

Significance of Branding in Kennewick

In Kennewick, branding plays a vital role not just in the business landscape but also in the cultural fabric of the community. The local culture emphasizes heritage and identity, which is reflected in the branding practices that businesses adopt. Companies that utilize branding effectively can create a strong connection with their customer base, fostering loyalty and recognition.The influence of local culture on branding practices is significant in Kennewick.

Businesses often incorporate elements of the region’s history or natural beauty into their branding strategies, allowing them to resonate with their customers on a deeper level. This connection helps to establish a unique identity that distinguishes them from competitors.

Key Businesses Utilizing Branding Irons

Several prominent businesses in Kennewick have adopted branding irons as part of their branding strategies. This method not only enhances the aesthetic appeal of their products but also reinforces their brand identity. Here are a few notable examples:

  • Local Restaurants: Establishments like “The Grilled Cheese Café” use branding irons to imprint their logo on bread, creating a memorable dining experience.
  • Artisan Craft Shops: Shops such as “River City Pottery” brand their handmade ceramics, adding a personal touch that reflects local artistry.
  • Farmers’ Markets: Vendors frequently use branding irons on wooden crates and packaging, emphasizing their commitment to local agriculture and handmade goods.

The use of branding irons extends beyond just aesthetics; it represents a commitment to quality and tradition, elements that are deeply valued in the Kennewick community.

Role of Branding in Building Business Identity

Branding is essential for establishing a business identity in Kennewick, as it serves as the first impression for potential customers. A well-defined brand not only communicates the values and mission of a business but also fosters a sense of trust among consumers. In an area where community ties are strong, a recognizable brand can lead to increased customer loyalty and word-of-mouth promotion.Effective branding strategies in Kennewick often include incorporating local symbols, colors, and narratives that resonate with the community.

For example, the use of the Columbia River or local flora in branding materials can create a connection that appeals to the local populace.

“A strong brand is not just a logo; it’s an experience that connects with customers on a personal level.”

By fostering a sense of belonging and pride, businesses in Kennewick can leverage their branding to build lasting relationships with their customers, ultimately driving growth and success in a competitive marketplace.

Photography Tips for Branding Irons

Capturing high-quality images of branding irons can greatly enhance their appeal, whether for marketing or personal use. A well-composed photograph can showcase the intricate details and craftsmanship of the iron, making it stand out in a crowded market. This guide will provide you with essential techniques for achieving stunning branding iron photography.

Lighting Techniques for Branding Iron Photography

Proper lighting is crucial for any photography, especially when working with metallic objects like branding irons that can create reflections. Natural light is ideal, as it provides a soft and even illumination. However, when shooting indoors or in low-light conditions, consider using diffuse artificial lighting. Here are some useful tips for achieving optimal lighting:

  • Use softbox lights to minimize harsh shadows and reflections.
  • Position the branding iron near a window for natural light, avoiding direct sunlight to prevent glare.
  • Experiment with different angles to find the most flattering light that highlights the design.
  • Consider using a reflector to bounce light and fill in shadows, ensuring every detail is visible.

Background Selection for Branding Iron Photography

The background plays a vital role in the overall composition of your photos. A cluttered or distracting background can take attention away from the branding iron itself. Opting for a simple and complementary backdrop will help emphasize the subject. Here are some background options to consider:

  • A neutral-colored surface such as a wooden table or a plain fabric can create an elegant setting.
  • Using a gradient backdrop can add depth without overwhelming the branding iron.
  • For a rustic look, consider incorporating elements like leather or stone that complement the branding iron’s material.
  • A solid-colored background can also work well, especially if it contrasts with the iron to make it pop.

Composition Techniques for Branding Iron Photography

Good composition is key to making your branding iron photos visually appealing. The way you frame your shot can determine the overall impact of the photograph. Applying techniques like the rule of thirds, leading lines, and close-ups can greatly enhance the aesthetics. Here are some effective composition strategies:

  • Utilize the rule of thirds by placing the branding iron off-center to create a dynamic image.
  • Incorporate leading lines, such as a wooden table edge, to draw the viewer’s eye towards the iron.
  • Experiment with depth of field; a shallow depth can blur the background while keeping the branding iron sharp.
  • Capture close-up shots to showcase intricate details, textures, and the quality of the metalwork.

“Great photography is about capturing the essence of the subject, and in the case of branding irons, it’s about highlighting their unique craftsmanship.”

Collecting and Showcasing Branding Iron Photos

Collecting and showcasing branding iron photos can be an exciting venture, whether for personal enjoyment or for promoting a business. A well-curated collection not only highlights the unique characteristics of each branding iron but also tells a story that resonates with viewers. This section will cover how to effectively organize your collection, design a visually appealing layout for showcasing your images, and create an engaging photo gallery.

Organizing a Collection of Branding Iron Photos

Organizing your collection is essential for easy access and presentation. Start by categorizing your photos based on specific criteria that resonate with your personal style or business needs.

  • Type of Branding Iron: Group photos by the type of branding iron, such as traditional, modern, or custom designs.
  • Usage Context: Organize images based on the context of use, whether it be cattle branding, artistic displays, or collectible items.
  • Date of Capture: Arrange photos chronologically to showcase your photography journey or the evolution of branding designs over time.
  • Quality and Style: Sort high-quality images separately to feature in professional portfolios or marketing materials.

Utilizing digital photo management tools or software can help streamline this process. These platforms often allow for tagging and easy searching, making your collection accessible at all times.

Designing a Layout for Displaying Branding Iron Images

A cohesive layout enhances the viewing experience for your audience. When designing your website or social media display, consider the following elements to create an aesthetically pleasing showcase.

  • Grid Layout: Use a grid system to provide a structured view. Each image can occupy a uniform space, ensuring the design remains tidy.
  • Full-Width Images: For dramatic impact, feature full-width images of standout branding irons at the top of the page or in prominent sections.
  • Captioning: Include informative captions under each photo that provide context, such as the brand, country of origin, or the story behind the iron.
  • Responsive Design: Ensure the layout is mobile-friendly, allowing users to view your collection seamlessly on various devices.

Remember, a well-thought-out design reflects professionalism and attracts more viewers to your collection.

Creating an Engaging Photo Gallery Featuring Branding Irons

Engagement is key to maintaining viewer interest in your branding iron collection. Implementing interactive and visually stimulating features will enhance the gallery experience.

  • Slideshow Functionality: Incorporate a slideshow feature that allows users to cycle through images smoothly, accompanied by background music or sound effects that resonate with the rustic charm of branding.
  • Zoom Feature: Adding a zoom-in functionality on hover allows viewers to see intricate details of each branding iron, which can be particularly captivating.
  • Storytelling Sections: Create narrative sections within your gallery that delve into the historical significance of certain branding irons, enhancing the viewer’s knowledge and appreciation.
  • User Interaction: Enable features for viewers to comment or share their thoughts, creating a community around your collection.

By focusing on these elements, you can transform a simple photo gallery into a dynamic and engaging experience that draws viewers in and keeps them coming back for more.

Local Events and Branding Iron Culture in Kennewick

Kennewick hosts a vibrant community that values craftsmanship, particularly in the art of branding irons. The local culture celebrates this unique aspect of artistry through various events that not only showcase the work of artisans but also connect history and modernity in the realm of branding practices. These gatherings offer a platform for education, appreciation, and networking among enthusiasts and craftsmen alike.One of the standout features of Kennewick’s branding iron culture is the annual Kennewick Craft Fair.

This event draws artisans from across the region, focusing on showcasing handmade goods, including branding irons. Attendees can witness live demonstrations of the crafting process, highlighting the skill and precision involved in creating these unique tools. Local vendors often share stories behind their branding irons, reflecting traditions passed down through generations.

Local Artisan Experiences

The artisan community in Kennewick is rich with stories and experiences that underline the significance of branding irons in both practical and artistic realms. Many local craftsmen have dedicated their lives to mastering the art of branding, often beginning as apprentices under seasoned professionals. These stories illustrate the passion and dedication that fuel the craftsmanship.For example, one artisan, known for her intricate designs, often shares how she incorporates personal stories into her branding irons.

Each piece not only serves a functional purpose but also tells a story of heritage and identity. Local artisans frequently engage with the community by offering workshops, where they teach participants the fundamentals of branding iron creation, fostering a deeper appreciation for this traditional craft.

Exhibitions and Fairs Featuring Branding Irons

Throughout the year, Kennewick hosts a variety of exhibitions and fairs that put branding irons at the forefront, celebrating this unique aspect of craftsmanship. These events serve as gathering spots for artisans, collectors, and the general public to explore the intricate details and craftsmanship behind branding irons.A notable event is the Kennewick Heritage Festival, which emphasizes local history and craftsmanship.

Here, branding irons are not only displayed but are also used in live demonstrations, allowing attendees to see the striking process firsthand. The festival features stands where local artisans can sell their creations, making it a vibrant marketplace for unique, handcrafted items.Another key event is the annual Artisan Craft Show, where branding irons often feature prominently among other handmade crafts.

This show attracts visitors from neighboring towns, eager to see and purchase custom pieces. Artisans participate by showcasing their skills, sharing insights into the branding process, and discussing the historical significance of branding irons in livestock management and personal identification.

“Branding irons are not just tools; they are a legacy that connects us to our roots and traditions.”

Case Studies of Successful Branding Iron Usage

The effective use of branding irons in Kennewick has proven to be a game-changer for many local businesses. These case studies highlight the impact of branding irons on brand recognition and customer loyalty, showcasing how traditional branding techniques can still hold significant value in a modern marketplace. Here we delve into specific examples of businesses that have harnessed the power of branding irons to enhance their identity and connect with their communities.

Local Business Examples

Several businesses in Kennewick have successfully integrated branding irons into their operations, leading to positive outcomes. These case studies illustrate their strategies and the results achieved.

  • Pioneer Coffee Roasters
  • This local coffee shop utilized branding irons to imprint their logo onto wooden coffee cups and coasters. This not only created a unique aesthetic but also fostered a sense of community among customers. As a result, they saw a 25% increase in repeat business within six months of implementing the branding iron strategy.
  • River Stone Kitchen
  • A popular restaurant in the area used branding irons to mark their signature dishes, such as steaks and artisanal bread. This not only enhanced the presentation but also helped in marketing their offerings. Feedback indicated that customers appreciated the attention to detail, leading to a 40% increase in social media shares of their food posts.
  • Saddle Up Western Wear
  • This retail store focused on branding leather goods with their store logo using a branding iron. The unique products became a talking point among customers and contributed to a 30% sales boost during the holiday season. The branding technique also created a memorable experience that customers share with friends and family.

Lessons Learned from Successful Strategies

The successful implementation of branding irons by these businesses offers valuable insights into effective branding strategies.

Distinctive Branding Creates Identity

Businesses that have embraced branding irons have established a recognizable identity that resonates with customers. This has led to brand loyalty and increased word-of-mouth referrals.

Emphasizing Quality and Craftsmanship

Using branding irons signifies a commitment to quality and craftsmanship. Customers often perceive branded products as more authentic, leading to greater appreciation and willingness to pay a premium.

Engagement Through Experience

Incorporating branding irons into customer experience—such as branding products on-site—can enhance engagement. This interactive element creates memorable experiences that customers are likely to share, further promoting the brand.

Community Connection

Businesses using branding irons often emphasize local culture and traditions, which fosters a strong connection with the community. This strategy has proven effective in building a loyal customer base that values local identity.

“A brand is no longer what we tell the consumer it is – it is what consumers tell each other it is.” – Scott Cook

Creating a DIY Branding Iron

Crafting a custom branding iron can be a rewarding project that allows you to showcase your individuality and creativity. A DIY branding iron not only serves a practical purpose but adds a personal touch to your items, whether for branding livestock, crafts, or collectibles. This guide will take you through the steps of designing and crafting your own unique branding iron.The process of creating a branding iron involves several essential steps, from designing your logo to choosing the right materials and tools.

It requires some planning and skill but can easily be accomplished with a bit of patience and creativity. Below, you’ll find the detailed steps you need to follow, along with important safety precautions and local resources for sourcing your materials in Kennewick.

Step-by-Step Guide to Designing and Crafting a Custom Branding Iron

To ensure a successful crafting experience, here’s a detailed guide that Artikels each step involved in creating your branding iron:

Design the Branding Iron

Start by sketching your design on paper. Consider simple shapes or initials that will be clear when branded.

  • Transfer your design onto graph paper to ensure accurate scaling.
  • Select Materials

The most common material for the branding head is steel or brass due to their durability.

  • Choose a sturdy handle material, such as hardwood or metal, that can withstand heat.
  • Crafting the Branding Head

Cut the metal to the appropriate size based on your design.

  • Use a torch or welding equipment to carefully shape your design into the head. This step can require specialized skills, so consider seeking help if needed.
  • Attach the Handle
  • Securely attach your branding head to the handle using welding or strong adhesive, ensuring that it feels comfortable and balanced.
  • Test Your Branding Iron

Heat the branding iron using a suitable heat source. A propane torch or furnace works well.

  • Test the iron on a scrap piece of wood or leather to ensure the design transfers clearly.
  • Finalize and Use

Once satisfied, your branding iron is ready for use! Make sure to store it safely after each use to maintain its integrity.It’s crucial to be aware of safety precautions while working with tools and materials during the crafting process.

Safety Precautions and Best Practices

Handling tools and materials requires careful attention to safety, especially when working with heat and metal. Here are essential safety measures to follow:

Always Wear Protective Gear

Use safety goggles, gloves, and a mask to protect yourself from flying debris and fumes.

Work in a Well-Ventilated Area

Ensure good airflow to avoid inhaling harmful fumes generated during cutting or welding.

Use Tools Correctly

Familiarize yourself with each tool’s operation before using it to avoid injuries.

Keep a Fire Extinguisher Nearby

Since you’ll be working with heat, having immediate access to fire safety is crucial.

Sourcing Materials Locally in Kennewick

Finding the right materials for your DIY branding iron can be conveniently done in Kennewick. Here are some local resources where you can source your materials:

Hardware Stores

Local hardware stores often carry metal sheets, welding supplies, and tools needed for your project.

Metal Fabrication Shops

Consider visiting specialized shops for high-quality metals that can help bring your branding iron design to life.

Craft Stores

For handles and decorative elements, local craft stores might provide suitable hardwood options and finishing materials.

Online Local Marketplaces

Check local classifieds or community boards for second-hand tools or materials that may be available at a lower cost.By following these steps and tips, you’ll be well on your way to crafting a unique DIY branding iron that is not only functional but also a reflection of your personal style.

Trends in Branding Iron Design

Branding Decision and its Crucial Role in Marketing | MBA TUTS

The design of branding irons has evolved significantly in recent years, reflecting changes in technology, style, and functionality. Modern branding irons now incorporate innovative features that not only enhance their aesthetic appeal but also improve their usability. Understanding these trends is essential for anyone interested in the branding iron culture in Kennewick.Current branding iron designs showcase a blend of tradition and modernity, where innovative techniques are employed to create more refined and effective branding tools.

Factors such as user preferences, material advancements, and creative design techniques contribute to this evolution, offering unique solutions for contemporary branding needs.

Innovative Features in Branding Iron Technology

Modern branding irons are equipped with various innovative features that enhance their functionality and ease of use. These advancements cater to the needs of both casual users and professional artisans. Some notable innovations include:

  • Customizable Designs: Many new models allow users to easily customize the branding plate, accommodating different logos and designs without the need for specialized equipment.
  • Temperature Control: Advanced digital temperature control systems enable precise heating, ensuring consistent branding results regardless of the material being branded.
  • Ergonomic Handles: Modern branding irons often feature ergonomic design elements, making them easier to hold and maneuver during use, reducing fatigue during lengthy branding sessions.
  • Cordless Options: The introduction of battery-operated branding irons provides increased mobility and convenience, eliminating the hassle of cords and power sources.
  • Durable Materials: New alloys and materials used in branding iron construction enhance durability and heat retention, improving performance and lifespan.

Comparing Traditional and Modern Branding Iron Designs

The distinction between traditional and modern branding iron designs lies in their functionality and ease of use. Traditional branding irons, typically made from solid metals, focus on basic functionality, while modern designs incorporate enhanced features that elevate the branding experience.The traditional branding iron is characterized by:

  • Simple Shapes: Often limited to straightforward branding patterns, these irons are effective but lack the versatility seen in newer designs.
  • Static Heating Elements: Heat is applied uniformly, requiring careful handling to avoid uneven branding results.
  • Manual Operation: Most traditional designs rely solely on manual operation, which can be physically demanding over extended use.

In contrast, modern branding irons exhibit:

  • Complex Customizations: The ability to create intricate designs and logos with fine details not achievable with traditional methods.
  • Enhanced User Experience: Features like digital displays and adjustable settings provide users with greater control over their branding process.
  • Improved Efficiency: Modern designs often heat up faster and maintain temperature more effectively than traditional irons, resulting in quicker branding times.

The ongoing trends in branding iron design showcase a significant shift towards user-centric features, marrying the best of both worlds: the rich heritage of branding with modern technological advancements.

Conclusive Thoughts

In conclusion, the exploration of branding iron kennewick photos reveals the intricate relationship between art and identity in Kennewick. From capturing stunning images to understanding the impact of branding on local businesses, this journey highlights the craftsmanship and creativity that define the community. As you delve into this captivating world, consider how branding irons not only serve a purpose but also tell a story of heritage and innovation.

Q&A

What are branding irons used for?

Branding irons are used to create a permanent mark or logo on various materials like wood, leather, and metals, representing business identity and craftsmanship.

How can I improve my branding iron photography?

To improve your branding iron photography, focus on good lighting, choose complementary backgrounds, and use composition techniques like the rule of thirds.

What materials are commonly used for branding irons?

Common materials include steel for durability and heat retention, while some may use brass or copper for artistic designs.

Are there local events in Kennewick related to branding?

Yes, Kennewick hosts various local events that celebrate craftsmanship and branding, allowing artisans to showcase their work and connect with the community.

Can I create my own branding iron?

Yes, you can create your own branding iron by following a DIY guide that includes design, crafting, and safety precautions.

Branding iron for wood projects is more than just a tool; it’s a means of personal expression and craftsmanship. Whether you’re a hobbyist or a professional woodworker, incorporating a branding iron into your projects can add a unique touch that sets your work apart. This guide will walk you through the fascinating history of branding irons, their various types, and essential techniques to achieve that perfect mark.

From understanding the different types of branding irons available to designing your custom brand, we’ll cover everything you need to know. We’ll also discuss safety measures and maintenance tips, ensuring you can enjoy your branding experience while keeping your tools in top shape.

Introduction to Branding Irons

Branding irons serve as essential tools in woodworking, bringing a personal touch to creations by marking items with unique insignias or logos. These tools not only add aesthetic value but also serve practical purposes like identifying ownership or ensuring quality, making them indispensable for artisans, hobbyists, and professionals alike. The art of branding wood has a rich history, reflecting the craftsmanship and ingenuity of various cultures throughout the ages.The evolution of branding tools can be traced back to ancient civilizations, where artisans used simple heated metal rods to mark their work.

Over time, these tools transformed from basic marks to intricate designs, showcasing the skills and artistry of woodworkers. The introduction of electric branding irons in the 20th century further revolutionized the process, making it more accessible and efficient. Today, branding irons are available in various forms, including custom-made stamps and adjustable temperature tools, catering to a wide array of woodworking projects.

Uses of Branding Irons in Wood Projects

Branding irons are versatile tools that find application in multiple facets of woodworking projects. Their uses extend beyond mere decoration; they contribute to craftsmanship, branding, and personalization of items. Here are some notable applications:

  • Personalization: Branding irons allow artisans to imprint names, dates, or custom designs on wooden items, turning ordinary pieces into unique keepsakes.
  • Branding: Businesses utilize branding irons to add their logos to products, enhancing brand recognition and establishing a professional image.
  • Identification: Craftsmen use branding to mark their creations, ensuring their work is recognized and attributed to them, fostering a sense of ownership.
  • Quality Assurance: Branding can signal the quality or origin of a product, serving as a guarantee that a wood item meets specific standards.
  • Artistic Expression: Branding irons can be used creatively to develop unique patterns and textures, adding an artistic flair to functional pieces.

The importance of branding irons in woodworking is evident, as they blend functionality with artistry. Their ability to personalize and identify wood projects elevates the craftsmanship, while their historical significance underscores the connection between artisans and their tools. As technology advances, branding irons continue to adapt, ensuring they remain relevant in the creative world of woodworking.

Types of Branding Irons

Branding irons have become essential tools for craftsmen and woodworkers looking to add a personal touch to their projects. Numerous types of branding irons exist on the market, each offering distinct features and functionalities. This section dives into the various types of branding irons available, comparing electric and manual options while examining their respective advantages and disadvantages.

Comparison of Electric and Manual Branding Irons

Understanding the differences between electric and manual branding irons can help users make informed choices based on their specific needs and preferences. Each type serves the same purpose—branding—but operates differently, leading to variations in ease of use, efficiency, and output quality.Manual branding irons, typically made of solid metal, require the user to heat them over an open flame or a heat source until they reach the desired temperature.

This method is straightforward and often has a lower initial investment compared to electric models. However, the process can be time-consuming since the user must wait for the iron to heat up before branding each piece. Electric branding irons, on the other hand, are designed for convenience and efficiency. They are plugged into an electrical outlet and heat up quickly, allowing for a faster branding process.

Many electric models come with temperature controls, making it easier to achieve consistent results. However, they usually have a higher upfront cost and may not be suitable for outdoor or remote work where electricity isn’t available.

  • Manual Branding Irons:

    Manual branding irons offer a classic approach to branding, ideal for those who appreciate traditional craftsmanship.

    Advantages:

    • Lower initial cost
    • Simple and durable design
    • Portable—no need for electricity

    Disadvantages:

    • Longer heating time
    • Requires more physical effort
    • Less control over heat consistency
  • Electric Branding Irons:

    Electric branding irons provide a modern solution for fast and efficient branding.

    Advantages:

    • Quick heat-up time
    • Temperature control for consistent results
    • Less physical effort required

    Disadvantages:

    • Higher initial investment
    • Dependency on electrical outlets
    • Potential heat-related safety risks

The choice between electric and manual branding irons ultimately depends on the user’s specific requirements and preferences. For artisans who value mobility and simplicity, manual branding irons may be the ideal choice. Conversely, for those seeking efficiency and ease of use, electric branding irons can significantly enhance the branding process, making them an attractive option for modern woodworkers.

Choosing the Right Branding Iron

When it comes to wood projects, selecting the right branding iron is crucial for achieving high-quality results. The perfect branding iron not only enhances the aesthetic appeal of your creations but also communicates your craftsmanship and style. This guide will walk you through the essential factors to consider when choosing a branding iron tailored to your specific projects.Several critical factors come into play when selecting a branding iron.

Understanding these factors ensures that you make an informed decision based on your project requirements and personal preferences. Consider the size, design, and material of the branding iron, as each element impacts the final result and ease of use.

Factors to Consider

Understanding the factors that influence your choice of branding iron can greatly enhance your project outcomes. Here are the main considerations:

  • Size: The size of the branding iron should match the dimensions of your project. A large branding iron might overwhelm a small piece, while a tiny one could look insignificant on a large surface. Consider the scale and placement of your branding.
  • Design: The design of the branding iron is vital for aesthetic appeal. Whether you choose a custom design or a pre-made logo, ensure it represents your brand or personal style effectively. Look for options that allow customization to truly make your mark.
  • Material: Branding irons are typically made from brass, stainless steel, or iron. Brass is known for its durability and heat retention, making it ideal for consistent branding. Stainless steel offers resistance to rust and corrosion, while iron is often more affordable but may require more maintenance.

When analyzing branding iron features, both beginners and professionals have distinct needs.

Comparison of Features

The choice of branding iron can differ significantly between beginners and professionals. Below is a comparison of relevant features that cater to both experience levels.

Feature Beginners Professionals
Ease of Use Look for user-friendly designs that are easy to handle and operate. May require more advanced features for efficiency and precision.
Customization Options Basic designs or pre-made templates are often sufficient. Custom logos and detailed designs are standard for branding purposes.
Price Range Budget-friendly options are available to accommodate learning. Investments in high-quality, durable tools are common.
Heat Source Electric branding irons are recommended for beginners for ease of use. Professionals might prefer gas-powered or self-heating irons for versatility.

“Choosing the right branding iron can elevate your woodworking projects from ordinary to extraordinary.”

Understanding these aspects will help you select a branding iron that fits your project’s needs and your skill level, leading to more satisfying results in your woodworking endeavors.

Designing a Custom Branding Iron

Creating a custom branding iron allows artisans and woodworkers to add a personal touch to their projects. This process not only enhances the uniqueness of your work but also establishes a recognizable brand identity. Designing a branding iron from scratch involves several key steps that combine creativity with practical considerations.To start, it’s essential to have a clear vision of the design you want.

Whether it’s a logo, initials, or a unique pattern, sketching out your ideas on paper can provide a solid foundation. Once you have a sketch, you can move on to the digital design phase, which involves choosing the right tools and software. Below are the systematic steps to guide you through the process of designing your custom branding iron.

Steps to Design a Custom Branding Iron

The design of a branding iron can be broken down into a few critical steps. These steps ensure that the final product not only looks good but also functions well when applied to wood.

  1. Research and Inspiration: Begin by looking at existing branding irons and designs. Gather inspiration from various sources, such as art, nature, or typography. This can help you identify styles and elements you want to incorporate into your brand.
  2. Sketch Your Ideas: Once you have a clear idea, sketch your design. Focus on simplicity and clarity, as intricate designs may not translate well into a branding iron.
  3. Choose the Right Font: Pick a font that reflects your brand’s personality. Ensure it is legible and bold enough to create a distinct impression when burned into wood. A classic serif or a clean sans-serif font often works well.
  4. Determine Size and Proportions: The size of your branding iron will affect visibility and clarity. A larger design may be more visible but can also require more heat, while a smaller design needs to be detailed enough to be recognizable.
  5. Digital Design: Utilize graphic design software like Adobe Illustrator or CorelDRAW to create a digital version of your sketch. These programs allow for precise adjustments and scaling, ensuring your design is perfect for engraving.
  6. Prepare the Design for Production: Convert your digital design into a format suitable for your branding iron manufacturer. This often involves creating vector files that can be easily scaled and manipulated without losing quality.
  7. Consult with Manufacturers: Before finalizing your design, consult with the manufacturer. They can provide insights on the feasibility of your design and suggest any necessary adjustments for optimal results.

Choosing the Right Font and Size for Branding Designs

The choice of font and size is pivotal in branding, as these elements convey your brand’s character and ensure legibility. Selecting the right font involves considering its style, weight, and size to create a lasting impression when branded into wood.

A bold, simple font is often more effective in branding, as it enhances readability and impact.

When selecting the font, consider the following aspects:

  • Style: Choose fonts that match your brand’s ethos. For instance, a rustic font suits a handmade wooden furniture brand, whereas a sleek, modern font may be better for contemporary designs.
  • Weight: Heavier fonts tend to produce clearer results on wood, as they hold more detail during the branding process.
  • Size: The size of your font should balance between visibility and detail. A font size of 1 to 2 inches is often recommended for branding irons, ensuring that the text is legible yet clear.

Tools and Software for Designing Branding Patterns

Having the right tools and software is essential for creating an effective branding iron design. Various applications can assist in the design process, offering features that cater to different skill levels and requirements.Some recommended tools include:

  • Adobe Illustrator: This professional software is excellent for creating vector designs. It allows for intricate detailing and scaling without loss of quality.
  • CorelDRAW: Another vector graphics software, CorelDRAW is user-friendly and is often favored by graphic designers for its efficiency in logo design.
  • Inkscape: For those seeking a free alternative, Inkscape offers robust vector editing capabilities suitable for designing branding patterns.
  • Laser Cutting Software: If you plan to create your branding iron using a laser cutter, software compatible with these machines, like LightBurn, will be necessary for precision cutting.

Using these tools effectively allows you to bring your creative vision to life, ensuring that your custom branding iron accurately represents your brand and stands the test of time.

Techniques for Effective Branding

Achieving a clean and impressive brand on wood surfaces requires not only the right equipment but also a solid understanding of branding techniques. The following guidelines will help ensure that your branding projects turn out exactly as envisioned, showcasing your creativity and craftsmanship.Effective branding on wood involves several important factors, including the proper preparation of both the wood surface and the branding iron.

Understanding these aspects will allow you to produce consistently sharp and clear impressions. Below are key techniques to consider.

Preparing the Wood Surface

The quality of the branding can be significantly affected by the condition of the wood. Properly preparing the surface is crucial for achieving the best results.

1. Sanding

Start by sanding the wood to a smooth finish using fine-grit sandpaper. This removes any rough spots and ensures better adhesion of the branding.

2. Cleaning

After sanding, wipe down the surface with a clean, damp cloth to remove dust and debris. This step is vital to prevent imperfections in the branding.

3. Drying

Allow the wood to dry completely before applying the branding iron. Moisture can lead to steam and warping, which affects the branding quality.

Heating and Applying the Branding Iron

The correct heating and application techniques are essential for achieving clear branding. Follow these best practices to maximize effectiveness:

1. Preheating

Always preheat the branding iron before use. An ideal temperature is between 800°F and 1000°F, depending on the type of wood. A well-heated iron creates a sharper mark.

2. Testing

Conduct a test on a scrap piece of wood to ensure the branding iron reaches the desired effect. This will help you adjust the heating time if needed.

3. Pressure Application

Apply even pressure when branding. Too much pressure can cause the iron to dig into the wood, whereas too little may result in faint impressions.

4. Timing

Hold the branding iron on the surface for a consistent amount of time, typically between 5 to 15 seconds, depending on the wood type and thickness. This helps create a deep, clear mark without burning the wood.

Common Mistakes to Avoid

Knowing pitfalls can help prevent issues during the branding process. Familiarize yourself with these common mistakes to enhance your branding efforts:

1. Inconsistent Heating

Not allowing the branding iron to reach the optimal temperature can lead to uneven results. Always ensure the iron is adequately heated.

2. Skipping Surface Preparation

Neglecting to sand and clean the wood can result in a poor-quality brand. Preparation is key to success.

3. Rushing the Process

Attempting to brand too quickly can lead to mistakes. Take your time to ensure each brand is applied correctly.

4. Ignoring Wood Type Differences

Different wood types react differently to branding. Be aware of the characteristics of the wood you are using and adjust your technique accordingly.

5. Inconsistent Pressure

Applying uneven pressure can result in a distorted brand. Maintain consistent pressure across the branding iron for the best outcome.

“Preparation, precision, and patience are the cornerstones of effective branding.”

Maintenance and Care for Branding Irons

To ensure the longevity and effectiveness of your branding irons, proper maintenance and care are essential. This not only helps in preserving the quality of the branding but also prevents damage that could occur from neglect. By following a few simple maintenance tips, you can keep your branding irons in excellent condition for many projects to come.

Maintenance Tips for Branding Irons

Regular maintenance of branding irons is crucial for achieving consistent results and extending their lifespan. Here are some key practices to follow:

  • Always inspect your branding irons for any signs of wear or damage before each use. Look for chips, cracks, or rust that could affect the branding quality.
  • Ensure that the heating element is functioning properly. An inconsistent heat source can lead to uneven branding.
  • Periodically lubricate any moving parts with a light machine oil to prevent sticking and ensure smooth operation.
  • Store branding irons in a dry area to prevent rust and corrosion. Moisture can drastically reduce the lifespan of metal components.

Cleaning Branding Irons After Use

Cleaning branding irons after each use is vital to maintain their functionality and appearance. Here’s a straightforward approach to ensure they remain clean:

  • Allow the branding iron to cool completely before cleaning to avoid burns.
  • Use a stiff-bristle brush to remove any residue or charred materials from the branding surface.
  • For tougher stains, soak the branding iron in a mixture of warm soapy water for a few minutes, then scrub gently with a non-abrasive sponge.
  • Rinse the branding iron thoroughly under warm water and dry it immediately to prevent rust.
  • Apply a thin layer of machine oil to the branding surface after cleaning to provide a protective barrier against moisture.

Storage Solutions for Branding Tools

Proper storage of branding irons can significantly prolong their life and ensure they are ready for use when needed. Here are some effective storage solutions:

  • Use a dedicated toolbox or storage container that has padding to prevent movement and potential damage during transport.
  • Consider wall-mounted racks with hooks specifically designed for tools, allowing for easy access and visibility.
  • Store branding irons in a horizontal position to avoid any bending or mishaping of the branding tip.
  • Avoid stacking heavy items on top of your branding tools to prevent pressure that could lead to warping or damage.

Common Projects Using Branding Irons

Branding irons are not just tools; they are a means of personalizing and elevating wood projects. From furniture to crafts, the application of a branding iron can add a unique touch that enhances both aesthetics and value. Crafting with wood often involves an emotional connection, and branding can solidify that relationship by marking projects with a signature style or personal emblem.Incorporating branding into various wood projects is a wonderful way to leave a lasting impression.

Popular applications include furniture making, decorative crafts, and personalized gifts, each benefiting from the distinctive mark of a branding iron. The act of branding not only signifies ownership but also showcases craftsmanship and attention to detail. Below are some common projects and methods where branding irons shine.

Popular Wood Projects Benefiting from Branding

Many woodworkers and hobbyists utilize branding irons in their projects. Here are a few noteworthy examples:

  • Furniture Making: Tables, chairs, and cabinets can be branded with the maker’s logo or a special design, turning functional pieces into unique works of art.
  • Wooden Toys: Toy makers often brand their creations with a logo or name, ensuring authenticity and quality assurance for parents.
  • Home Décor Items: Items such as wooden signs, picture frames, and wall art can feature branding to personalize and beautify living spaces.
  • Custom Gifts: Personalized gifts like cutting boards, coasters, and serving trays are enhanced with branding, making them thoughtful and memorable presents.

Incorporating branding into furniture making and crafts can be achieved using the following methods:

Incorporating Branding into Furniture Making and Crafts

When integrating branding into wood projects, specific techniques can be employed to ensure an effective and appealing finish. Here are some methods:

  • Placement: Choose a location on your project that is visible yet unobtrusive, such as the underside of a tabletop or on the back of a chair.
  • Temperature Control: Ensure your branding iron is at the correct temperature to avoid burning or damaging the wood surface while ensuring a clear imprint.
  • Design Consideration: Select a design that complements the project’s style; a rustic piece may benefit from a simpler, more organic logo.
  • Practice: Always test your branding iron on a scrap piece of wood before applying it to the final project to avoid mishaps.

Wood Types and Branding Compatibility

Different types of wood behave uniquely under heat, affecting the branding quality. Below is a table that lists various wood types and their compatibility with branding to help you make informed decisions:

Wood Type Compatibility with Branding
Oak Excellent, absorbs heat well and provides a clear imprint.
Pine Good, but may require careful temperature control to avoid burning.
Maple Good, produces a nice contrast and clear branding.
Walnut Excellent, provides a rich appearance with deep impressions.
Bamboo Fair, requires careful handling; may scorch easily.

Branding irons can significantly elevate wood projects, turning simple creations into treasured pieces of art. By understanding the types of wood and exploring various methods of incorporation, woodworkers can effectively personalize their projects while maintaining quality craftsmanship.

Safety Measures When Using Branding Irons

Branding overview | Marketing Donut

When engaging in wood branding projects, safety should be the top priority. The use of branding irons involves high temperatures that can lead to serious injuries if proper precautions are not taken. Understanding the essential safety measures can help prevent accidents and ensure a smooth branding experience.To safely wield a branding iron, it’s crucial to adopt specific practices and wear the necessary protective gear.

This not only safeguards the person branding but also those in the surrounding area. Familiarizing yourself with fire safety tips can further enhance safety during the branding process.

Essential Safety Precautions

Before beginning any branding project, there are fundamental safety precautions to keep in mind. These precautions help mitigate risks associated with hot tools and ensure a safe working environment.

  • Always work in a well-ventilated area to avoid smoke inhalation when branding wood.
  • Keep a fire extinguisher nearby to quickly address any potential fire hazards.
  • Ensure that the work surface is non-flammable and free of clutter to prevent accidental fires.
  • Never leave a hot branding iron unattended; it should always be placed in a designated holder when not in use.

Protective Gear Needed

Wearing appropriate protective gear is essential when working with branding irons. This gear minimizes exposure to heat and reduces the risk of burns or accidents during the branding process.

  • Heat-resistant gloves protect your hands from burns when handling hot tools.
  • Safety goggles shield your eyes from smoke or splinters that could arise during branding.
  • Long-sleeved shirts and pants made from non-flammable materials can protect your skin from accidental contact with hot surfaces.
  • Closed-toe shoes provide foot protection against hot branding irons or tools that may fall.

Fire Safety Tips

Implementing fire safety measures is vital when using branding irons. These tips ensure that the environment remains safe and that any potential fire hazards are managed effectively.

  • Have a clear workspace by removing any flammable materials such as paper, wood shavings, or solvents.
  • Use a heat-resistant mat or surface to conduct branding, minimizing risks of fire hazards.
  • Establish a safe distance between yourself and any flammable objects, ensuring that the area is free of distractions.
  • Understand how to properly extinguish different types of fires by being familiar with fire extinguisher types and their applications.

Marketing with Branding Irons

Branding is not just about putting a logo on a product; it plays a crucial role in enhancing the marketing of handmade wood products. By incorporating branding irons into your production, you can add a distinctive touch that sets your products apart in a crowded marketplace. This unique branding showcases the craftsmanship and authenticity of your work, making it more appealing to consumers who value quality and personalization.Branded items significantly impact customer perception and value.

When customers recognize a brand, it fosters trust and loyalty, which are essential for repeat business. A well-branded wood product conveys professionalism and attention to detail, leading customers to perceive higher value. This perception can justify premium pricing and improve overall sales.

Strategies for Effective Branding

To maximize the marketing potential of branding irons, consider integrating the following strategies into your promotional efforts. Each strategy enhances visibility and communicates your brand’s message effectively. Start with a strong brand story. Customers connect emotionally with stories, especially those tied to craftsmanship. Share the inspiration behind your wood projects and the journey of your brand.

Use your branding iron not only as a mark of identification but also as a focal point in your storytelling.Next, leverage social media. High-quality images of your branded products can create buzz across platforms like Instagram and Pinterest. Engage with your audience by showcasing the burning process and the intricate details of your branding, emphasizing the unique aspects of each piece.Incorporate your branding into packaging.

Attractive packaging that features your brand logo, alongside the burned insignia, reinforces brand identity. This not only enhances the unboxing experience but also encourages customers to share their purchases online.Additionally, create promotional materials that highlight your brand. Use brochures, business cards, and flyers that feature photographs of your branded products in action. Ensure your branding iron logo is prominent in these materials, as it will help to instill brand recognition in the minds of potential customers.Lastly, consider collaborations with local artisans or businesses that align with your brand values.

Co-branding initiatives can expand your reach and introduce your products to new audiences. This collaboration can result in unique, branded items that highlight the skills and creativity of all parties involved.By employing these strategies, you can transform the simple act of branding with an iron into a powerful marketing tool that elevates your handmade wood products and enhances customer engagement.

Last Word

In conclusion, a branding iron for wood projects is an invaluable asset that elevates your craftsmanship and enhances the value of your creations. By understanding the nuances of branding techniques, tools, and safety measures, you can ensure that your woodworking projects not only stand out but also leave a lasting impression. So, fire up your creativity and start branding your way to unique and personalized wooden art!

User Queries

What is a branding iron?

A branding iron is a tool used to imprint a design or logo onto wood, effectively marking it as your own.

How do I choose the right branding iron for my project?

Consider factors like size, design, and material based on the specifics of your project, whether you’re a beginner or a pro.

Can I create a custom branding iron?

Yes, you can design a custom branding iron by choosing the right font and size, and using appropriate tools for the design process.

How do I maintain my branding iron?

Regularly clean the branding iron after use and store it properly to prolong its lifespan.

What safety gear do I need when using a branding iron?

Always wear heat-resistant gloves and safety goggles to protect yourself from burns and debris.